Source Code
미리 정의된 레이아웃 사용 Jetpack Compose는 기준이 되는 축을 따라 컨텐츠를 배열하는 기본적인 레이아웃을 제공한다.
Horizontal: Row()
Vertical: Column()
Stacked: Box(), BoxWithConstraints()
기본 구성 요소 조합
1
2
3
4
5
6
7
8
9
10
11
12
13
14
15
16
17
18
19
@Composable fun CheckboxWithLabel (label: String , state: MutableState <Boolean >) Row( modifier = Modifier.clickable { state.value = !state.value }, verticalAlignment = Alignment.CenterVertically ) { Checkbox( checked = state.value, onCheckedChange = { state.value = it } ) Text( text = label, modifier = Modifier.padding(start = 8. dp) ) } }
Box() 내에서 먼저 작성한 뷰부터 뒤에서 겹쳐 쌓인다.
먼저 Column과 Box를 사용한 예제부터 확인
1
2
3
4
5
6
7
8
9
10
11
12
13
14
15
16
17
18
19
20
21
22
23
24
25
26
27
28
29
30
31
32
33
34
35
36
37
38
39
40
41
42
43
44
45
46
47
48
49
50
51
52
53
54
@Composable @Preview fun PredefinedLayoutsDemo () val red = remember { mutableStateOf(true ) } val green = remember { mutableStateOf(true ) } val blue = remember { mutableStateOf(true ) } Column( modifier = Modifier .fillMaxSize() .padding(16. dp) ) { CheckboxWithLabel( label = stringResource(id = R.string.red), state = red ) CheckboxWithLabel( label = stringResource(id = R.string.green), state = green ) CheckboxWithLabel( label = stringResource(id = R.string.blue), state = blue ) Box( modifier = Modifier .fillMaxSize() .padding(top = 16. dp) ) { if (red.value) { Box( modifier = Modifier .fillMaxSize() .background(Color.Red) ) } if (green.value) { Box( modifier = Modifier .fillMaxSize() .padding(32. dp) .background(Color.Green) ) } if (blue.value) { Box( modifier = Modifier .fillMaxSize() .padding(64. dp) .background(Color.Blue) ) } } } }
제약 조건을 기반으로 하는 레이아웃 생성 안드로이드의 전통적인 View기반 세계에서 ConstraintLayout으로 View 계층 구조를 평탄화한 것처럼 Box(), Row(), Column()을 중첩하는 행위를
Compose에서는 기본 제공은 아니고 gradle 추가 필요함
1 implementation 'androidx.constraintlayout:constraintlayout-compose:1.0.1'
Domain-Specific Language(DSL, 도메인 특화 언어)를 사용해 다른 요소와 연관이 있는 UI 요소의 위치와 크기를 정의한다.
그래서 내부에 있는 각각의 Composable 함수는 자신과 관련된 참조를 갖고 있어야 하며, 이 참조는 createRefs()를 사용해 생성된다.
제약조건은 modifier에서 constrainAs()를 사용하면 된다.
1
2
3
4
5
@Stable fun Modifier.constrainAs ( ref: ConstrainedLayoutReference , constrainBlock: ConstrainScope .() -> Unit ) this .then(ConstrainAsModifier(ref, constrainBlock))
constrainAs() 파라미터에서 후행 람다 표현식은 ConstrainScope를ConstrainScope 문서
이렇게 다른 컴포저블의 위치와 연결되는 위치를 정의하기 때문에 이런 프로퍼티를 anchors(앵커)라고 부른다.
ConstraintLayout() 예제 확인해보자
1
2
3
4
5
6
7
8
9
10
11
12
13
14
15
16
17
18
19
20
21
22
23
24
25
26
27
28
29
30
31
32
33
34
35
36
37
38
39
40
41
42
43
44
45
46
47
48
49
50
51
52
53
54
55
56
57
58
59
60
61
62
63
64
65
66
67
68
69
70
71
72
73
74
75
76
77
78
79
@ExperimentalComposeUiApi @Composable @Preview fun ConstraintLayoutDemo () val red = remember { mutableStateOf(true ) } val green = remember { mutableStateOf(true ) } val blue = remember { mutableStateOf(true ) } ConstraintLayout( modifier = Modifier .fillMaxSize() .padding(16. dp) ) { val (cbRed, cbGreen, cbBlue, boxRed, boxGreen, boxBlue) = createRefs() CheckboxWithLabel( label = stringResource(id = R.string.red), state = red, modifier = Modifier.constrainAs(cbRed) { top.linkTo(parent.top) } ) CheckboxWithLabel( label = stringResource(id = R.string.green), state = green, modifier = Modifier.constrainAs(cbGreen) { top.linkTo(cbRed.bottom) } ) CheckboxWithLabel( label = stringResource(id = R.string.blue), state = blue, modifier = Modifier.constrainAs(cbBlue) { top.linkTo(cbGreen.bottom) } ) if (red.value) { Box( modifier = Modifier .background(Color.Red) .constrainAs(boxRed) { start.linkTo(parent.start) end.linkTo(parent.end) top.linkTo(cbBlue.bottom, margin = 16. dp) bottom.linkTo(parent.bottom) width = Dimension.fillToConstraints height = Dimension.fillToConstraints } ) } if (green.value) { Box( modifier = Modifier .background(Color.Green) .constrainAs(boxGreen) { start.linkTo(parent.start, margin = 32. dp) end.linkTo(parent.end, margin = 32. dp) top.linkTo(cbBlue.bottom, margin = (16 + 32 ).dp) bottom.linkTo(parent.bottom, margin = 32. dp) width = Dimension.fillToConstraints height = Dimension.fillToConstraints } ) } if (blue.value) { Box( modifier = Modifier .background(Color.Blue) .constrainAs(boxBlue) { start.linkTo(parent.start, margin = 64. dp) end.linkTo(parent.end, margin = 64. dp) top.linkTo(cbBlue.bottom, margin = (16 + 64 ).dp) bottom.linkTo(parent.bottom, margin = 64. dp) width = Dimension.fillToConstraints height = Dimension.fillToConstraints } ) } } }
단일 측정 단계의 이해 Column()에서 2개의 Text를 넣으면, 첫 번째 Text의 길이에 따라 Column의 최대 길이가 달라지는 영향이 생긴다. -> 제약조건
1
2
3
4
5
6
7
8
9
10
11
12
13
14
@Composable inline fun Column ( modifier: Modifier = Modifier, verticalArrangement: Arrangement .Vertical = Arrangement.Top, horizontalAlignment: Alignment .Horizontal = Alignment.Start, content: @Composable ColumnScope .() -> Unit ) val measurePolicy = columnMeasurePolicy(verticalArrangement, horizontalAlignment) Layout( content = { ColumnScopeInstance.content() }, measurePolicy = measurePolicy, modifier = modifier ) }
여기서 measurePolicy 변수의 값에 따라 길이가 바뀐다.
측정 정책 정의 1 2 3 4 5 6 7 8 9 10 11 12 13 14 15 16 17 18 19 20 21 @PublishedApi @Composable internal fun columnMeasurePolicy ( verticalArrangement: Arrangement .Vertical , horizontalAlignment: Alignment .Horizontal ) if (verticalArrangement == Arrangement.Top && horizontalAlignment == Alignment.Start) { DefaultColumnMeasurePolicy } else { rowColumnMeasurePolicy( orientation = LayoutOrientation.Vertical, arrangement = { totalSize, size, _, density, outPosition -> with(verticalArrangement) { density.arrange(totalSize, size, outPosition) } }, arrangementSpacing = verticalArrangement.spacing, crossAxisAlignment = CrossAxisAlignment.horizontal(horizontalAlignment), crossAxisSize = SizeMode.Wrap ) } }
여기서 MeasurePolicy 인터페이스가 레이아웃을 어떻게 측정하고 배치할지 정의하기 때문에
```MeasureResult``` 인스턴스를 반환한다. 1 2 3 4 5 6 7 8 9 10 11 12 13 14 15 16 17 18 19 20 21 22 23 24 25 26 27 28 - 레이아웃의 크기 (width, height) - 정렬선 (alignmentLines) - 자식 요소를 배치하기 위한 로직 (placeChildren()) 기존 Android View 시스템에서는 자식 레이아웃을 다시 측정하면 성능 저하 때문에 한 번만 측정하고 있었다. 하지만 Compose에서 Layout은 자식 Layout의 intrinsic size(고유 크기)를 query(질의)할 수 있으며, 이를 사용해 크기나 위치를 지정한다. - minIntrinsicWidth() - maxIntrinsicWidth() - minIntrinsicHeight() - maxIntrinsicHeight() ```kotlin fun IntrinsicMeasureScope.minIntrinsicWidth( measurables: List<IntrinsicMeasurable>, height: Int ): Int { // measurables에서 DefaultIntrinsicMeasurable() 값에 해당되는 값들로 변경 List<Measurable> val mapped = measurables.fastMap { DefaultIntrinsicMeasurable(it, IntrinsicMinMax.Min, IntrinsicWidthHeight.Width) } val constraints = Constraints(maxHeight = height) val layoutReceiver = IntrinsicsMeasureScope(this, layoutDirection) // 크기 측정 val layoutResult = layoutReceiver.measure(mapped, constraints) return layoutResult.width }
1 2 3 4 5 6 7 8 9 10 11 12 13 14 15 16 17 18 19 20 21 22 23 24 25 26 27 28 29 30 31 32 33 34 35 36 37 38 39 40 41 42 internal class DefaultIntrinsicMeasurable val measurable: IntrinsicMeasurable, val minMax: IntrinsicMinMax, val widthHeight: IntrinsicWidthHeight ) : Measurable { override val parentData: Any? get () = measurable.parentData override fun measure (constraints: Constraints ) if (widthHeight == IntrinsicWidthHeight.Width) { val width = if (minMax == IntrinsicMinMax.Max) { measurable.maxIntrinsicWidth(constraints.maxHeight) } else { measurable.minIntrinsicWidth(constraints.maxHeight) } return FixedSizeIntrinsicsPlaceable(width, constraints.maxHeight) } val height = if (minMax == IntrinsicMinMax.Max) { measurable.maxIntrinsicHeight(constraints.maxWidth) } else { measurable.minIntrinsicHeight(constraints.maxWidth) } return FixedSizeIntrinsicsPlaceable(constraints.maxWidth, height) } override fun minIntrinsicWidth (height: Int ) Int { return measurable.minIntrinsicWidth(height) } override fun maxIntrinsicWidth (height: Int ) Int { return measurable.maxIntrinsicWidth(height) } override fun minIntrinsicHeight (width: Int ) Int { return measurable.minIntrinsicHeight(width) } override fun maxIntrinsicHeight (width: Int ) Int { return measurable.maxIntrinsicHeight(width) } }
Layout() Composable 함수는 컨텐츠, MeasurePolicy, Modifier 이 3개의 parameter를 받는다.
MeasurePolicy는 Layout을 어떻게 측정(measure)하고 위치시킬지 정의한다.
Layout의 고유 크기는 해당 입력값의 최소 또는 최대 크기를 결정한다.
Jetpack Compose에서는 자식 뷰를 화면에 배치하기 전에 딱 한 번만 측정되기를 요구한다. 이는 측정성을 향상하는 결과를 불러온다.
커스텀 레이아웃 작성
커스텀 레이아웃은 적어도 2개의 매개변수를 받는데, content와 Modifier를 기본값으로 갖는 modifier다.
1 2 3 4 5 6 7 8 9 10 11 12 13 14 15 16 17 18 19 20 21 22 23 24 25 26 27 28 29 30 31 32 33 34 35 36 @Composable @Preview fun CustomLayoutDemo () SimpleFlexBox { for (i in 0. .42 ) { ColoredBox() } } } @Composable fun ColoredBox () Box( modifier = Modifier .border( width = 2. dp, color = Color.Black ) .background(randomColor()) .width((40 * randomInt123()).dp) .height((10 * randomInt123()).dp) ) } @Composable fun SimpleFlexBox ( modifier: Modifier = Modifier, content: @Composable () -> Unit ) Layout( modifier = modifier, content = content, measurePolicy = simpleFlexboxMeasurePolicy() ) }
커스텀 측정 정책 구현 구현체는 MeasureScope.measure() 구현체를 제공해야만 한다. 1 2 3 4 5 6 7 8 9 10 11 12 13 14 15 16 17 18 19 20 21 22 23 24 25 26 27 28 29 30 31 32 33 34 35 36 37 38 39 40 41 42 43 44 45 46 이유는 MeasurePolicy interface 안에 MeasureScope.measure()가 선언되어 있으니까 ```kotlin // MeasurePolicy.kt fun MeasureScope.measure( measurables: List<Measurable>, constraints: Constraints ): MeasureResult ```` ```kotlin private fun simpleFlexboxMeasurePolicy(): MeasurePolicy = MeasurePolicy { measurables, constraints -> val placeables = measurables.map { measurable -> measurable.measure(constraints) } // MeasureScope.measure() 구현체를 제공하는 대신 layout() 호출 -> MeasurePolicy 인터페이스의 구현체함수 호출 -> MeasureResult 리턴함 layout( constraints.maxWidth, constraints.maxHeight ) { // placementBlock: Placeable.PlacementScope.() -> Unit var yPos = 0 var xPos = 0 var maxY = 0 // placementBlock은 placeables를 반복하면서 xPos와 yPos를 증가시켜 placeable의 위치를 계산한다. placeables.forEach { placeable -> // placeable이 현재 열에 완벽히 맞는지 판단 및 xPos, yPos 값 조절 if (xPos + placeable.width > constraints.maxWidth ) { xPos = 0 yPos += maxY maxY = 0 } placeable.placeRelative( x = xPos, y = yPos ) xPos += placeable.width if (maxY < placeable.height) { maxY = placeable.height } } } }
placementBlock 람다식 안에서 Placeable.PlacementScope 클래스 내 선언된 함수들을 사용 가능하다.
1
2
fun Placeable.placeRelative (x: Int , y: Int , zIndex: Float = 0 f) placeAutoMirrored(IntOffset(x, y), zIndex, null )
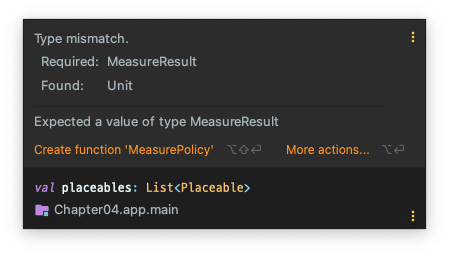
코드에서 layout을 잠시 지우면 이런 에러가 뜬다.
1
2
3
4
5
6
7
8
9
10
11
12
13
14
15
16
17
18
fun layout ( width: Int , height: Int , alignmentLines: Map <AlignmentLine , Int > = emptyMap() placementBlock: Placeable.PlacementScope.() -> Unit ) = object : MeasureResult { override val width = width override val height = height override val alignmentLines = alignmentLines override fun placeChildren () Placeable.PlacementScope.executeWithRtlMirroringValues( width, layoutDirection, this @MeasureScope as ? LookaheadCapablePlaceable, placementBlock ) } }
MeasureScope.measure()에서 리턴해야할 MeasureResult 구현체를 리턴함을 알 수 있다.
요약
미리 정의되어 있는 레이아웃 Row(), Column(), Box() 살펴보기
ConstraintLayout UI 요소 계층 구조 평탄화
Jetpack Compose에서 Layout
커스텀 레이아웃으로 자식 레이아웃의 렌더링을 정밀하게 제어하는 방법 알아보기